Monitor Keeps going to sleep? [Try these Fixes]
Monitor keeps going to sleep be it Windows 10, Windows 11, or macOS? Try Out the fixes below.
As daily users of the software, we cannot afford a single breakdown. What to do if your main asset i.e. your monitor doesn’t turn on or keeps going to sleep? You need not worry though.
Here is some handy information to tackle such problems. Computers are designed to save manual labor. Similarly, the lights of the monitor are designed in a way that it goes off automatically when not in use.
This saves energy and electricity. The attributes, however opportunistic they may be, do come with some obstacles.
However, if your system goes to sleep when you’re working or watching a movie, it becomes more of a hindrance than a facility.
Let’s see how we can tackle this.
Monitor Keeps Going to Sleep? Try these Fixes:
People from all around the world mostly depend on this software for most of their daily work.
Students who attend their classes from home have to be fully dependent on computers. In this situation, if the monitor automatically goes into sleep mode, or turns off, it is very difficult for people to work. This might make them face unpleasant consequences.
You might ask what is the main reason behind such disorders.
Why does the monitor go to sleep mode?
As per the question, there can be many reasons. Some of them are mentioned below.
- Settings with power
- Connection issues
- Un Updated System Or the Drive.
- Malfunctioned files of the system
Now that know the primary and most probable causes of the disorder, let’s see why your monitor keeps going to sleep.
In that case, you can follow the given methods:
- Troubleshooting hardware and system.
- Running files checker of the system
- Power plan to be changed
- Monitor Driver to be updated
- Windows to be updated
Troubleshooting hardware and system
The Windows operating system contains a troubleshooter that can identify and resolve the problems on its own. Thus we have an advantage over the biggest and the tiniest of glitches as they can often be reassembled.
So the process to activate it is as follows:
- Click on the windows logo tab along with the alphabet I. Windows settings will be opened. Now click on the option of Update and Security.
- Now look on the left side of the desktop, there will be an option of troubleshooting.
- Then on the right side there will be an option of recommended troubleshooting. Click on that and then opt for Run the troubleshooter. In a case where such an option isn’t given then pass over to the following step.
- Open the troubleshoot history option on the right side. Then see if there’s an option of Hardware and devices troubleshooting. Tap on that.
- Read the manual meticulously and have patience until the process of troubleshooting is completed.
Running File Checker of the system
Often the files in the system cause glitches and errors. So if that’s the reason for your monitor going into sleep mode then this method can be helpful. The process of system file checker is quick in action and it identifies the problem and resolves it in no time.
The method to be followed for this process is
- Click on the Windows logo tab along with the alphabet X. Now opt for the command prompt option given there.
(Another thing which you can do is to search directly for Command Prompt with the help of the search icon)
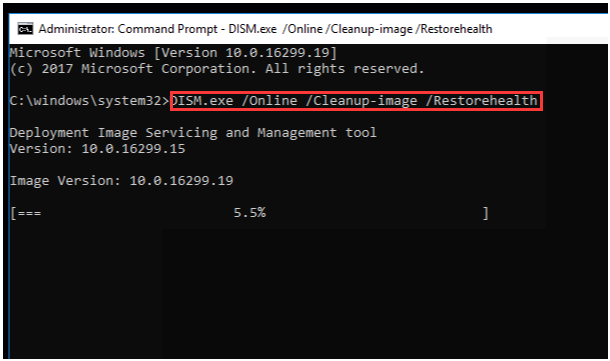
- Over there type “DISM.Exe /Online /Cleanup-Image /Restorehealth”, and after that click on the enter tab. Have patience till it’s done completely. Any Obstruction or interference will put the process to halt.
- After the completion of the process, write Sfc/Scannow and click on the Enter tab. The restoration process will start. Again have some patience while the process is ongoing.
- Finally when it’s Substantiated, write exit and click on the enter tab.
Change the Battery’s Power plan
Often the inadequate power supply results in glitches in the operating system. The excessive struggle to enhance the software power leads to certain defects. So we need to understand the limit before putting it into effect. By the given methods we can change the power adequacy.
- Click on the windows logo key along with the alphabet X and choose the power options.
- On the right side, beside the already available power plan setting, change plan setting choice is given.
- After clicking on that you will find an option to change advanced power settings.

- A list of options will open before you, click on the sleep option and then opt to allow hybrid sleep. Then turn it off.
- Then see where’s allow wake timers are given, click on it. Now tap on the enable button to switch on the battery and plugged in option
- In that display only, there will be an option of USB selective suspend settings. Click on that. To disable the, on battery and plugged in option, click on disable.
- Finish it by clicking on the apply button and pressing Ok.
- For the last option, Restart the device.
So this is another way by which going to sleep can be fixed. Now if it’s not, do not worry and proceed to the next method.
Update System Or the Drive
We need to keep our devices updated from time to time, or it will hamper our system. This can be another reason for our device going to sleep.
Even after getting the update procedure of the system is done and still the problem is happening, then go for updating your drive.
Follow the methods for updating your device:
- Click on the windows key logo along with the alphabet ‘X’ and opt for device manager.
- Track down the monitor and click on expand. Right click on the driver present beneath and opt for Update Driver.
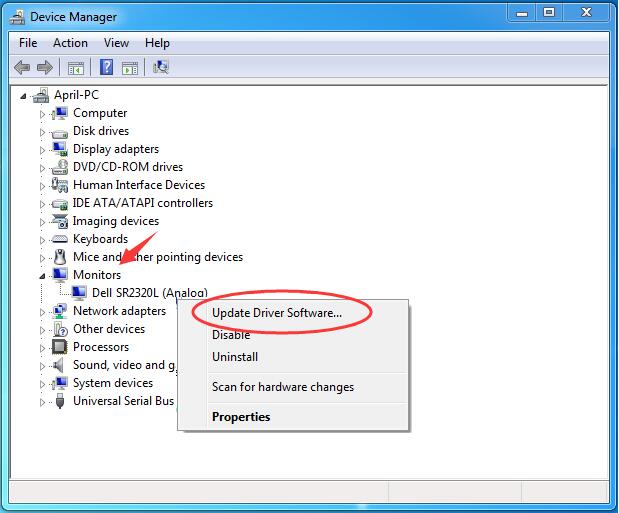
- It will give you two choices. Choose the first one that says to search automatically for an updated driver. After downloading it install the updates
- Reboot your device finally.
Another method for this is:
- See if the above mentioned methods are helping or not and continue doing it.
- On your screen, two of the options will be given, try number one i. e. Browse my computer for driver software
- Choose let me pick from the device drivers on my computer from the other screen. Go for the options that can be applicable for your device. Click the Next tab. Keep an eye on the instructions given and wait till it’s done.
- Finally reboot the device.
Again check if the issue is resolved.
Keep Windows Updated
This is an important method that should be applied to ensure the efficiency of the device. With the help of these steps, not only Windows but drivers are also updated.
So if you find an error in your system, it might be because your system is outdated. Often we see that by a common updating method, problems can be resolved. So here is the technique to do it.
- Click on the windows logo key along with the alphabet I that will open the settings option.
- Click on update and Security.
- On the right side, click on check for updates and download it.
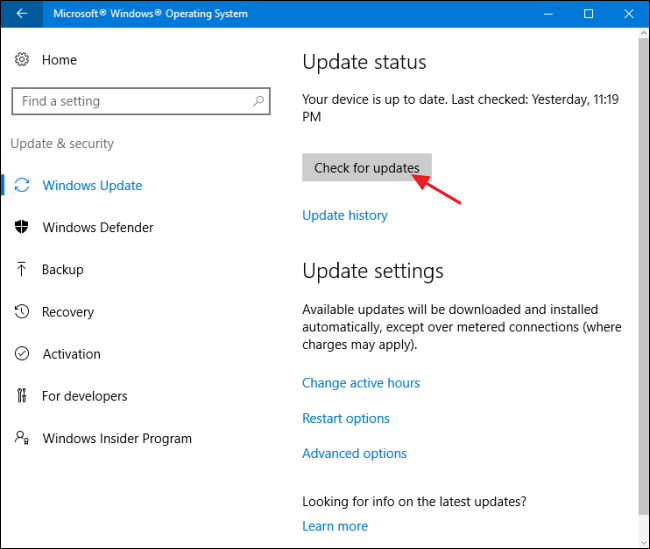
- Reboot your device.
These methods can help you fix the issue, in case you are still facing it then go for an expert’s advice.
Other Fixes you can try…
HP Monitor Keeps Going to Sleep – Fixes
If your HP Monitor keeps going to sleep, these are the first steps you should try.
Most users including HP monitor users also have the complaint that their screen keeps going off during use. The reason can be inappropriate settings of the power.
Often the plugs do not get enough power supply and that results in a black screen display. There is nothing to worry about if you face such an issue. What you can do is:
- Try plugging out the wire and then reinserting it. Sometimes the wire gets loose and can’t supply adequate power. You can also try putting the plugs into different sockets, in that way you’ll know whether your socket has got the problem or not.
- If still it doesn’t make any difference, try restarting your computer. Sometimes this fixes the errors.
The second monitor keeps going to sleep in Windows 10 / Windows 11

We often have to work on different things at once. In those cases, it is common to opt for a second help. Due to the multitasks we do, we connect a second monitor so that we can keep an eye on both things at the same time.
So what to do if our second monitor goes to sleep? We need to see if we have allowed multiple devices options for it to work (If this is happening only with the second monitor).
For changing the settings of the display and refraining from getting into sleep, here are the methods you can follow.
- On the keyboard, press the tab that has the windows key logo on it along with ‘S’ alphabet. Then Type ‘Display Settings’ and open it.
- At the right side of the desktop, search for the option of ‘‘Multiple Displays’.
- When you tap on it, it shows a list of options. Go for the option that says ‘ Show only on 2’.
- Now tap on the apply option to get the changes done.
Commonly with this method, this problem can easily be resolved. Check the screen if it’s working after following this method. If it’s not, then there might be some inner defect or malfunction.
The second monitor keeps going to sleep windows 10
Normally this can be due to inadequate power supply or the settings. Do follow the above steps and try changing the power settings this will help you fix it. For the last step, reboot your device.
Monitor keeps going to sleep and won’t wake up? Try These Fixes
It is a complaint we often face. So here are some basic troubleshooting ideas to fix such an issue.
Check the connection properly
Loose wires and cables often lead to this problem. So what you do is, check for the loose connections as it stops the power supply.
The method to do it is:
Check in the main connection and the ports that are connecting to it after turning off the entire device.
Then try applying VDA cables which can act as a substitute for HDMI cables.
Do see if there are multiple devices connected or not. That can also cause such problems.
After doing this, start your device and see if it got fixed.
Full Scanning.
Viruses can damage the entire device if it’s there. So check that your device is fully protected and has antivirus applied. Open the antivirus and go for full scanning of the device. Then restart your device and see if it is fixed.
Running on a Multiple Devices
Check if the multiple display option is applied. Otherwise, it also leads to screen blackening. Read the above information if you are facing a problem with the second monitor.
My external monitor keeps going to sleep (Solutions for Mac Users)
If you face an issue like this with the macOS, then follow this simple method
- A proper power setting has to be connected with your Mac
- Check if the sleep mode is activated, click on never to disable it.
- Reboot SMC
- Reset PRAM/ NVRAM
- Reboot the Mac in safe mode
- Try updating the device
- Refrain the device from getting overheated
- Cables can be changed and connected with an external monitor to your Mac.
- The mini display port can be unplugged and can be plugged back in.
The second monitor keeps going to sleep in windows 7
To prevent such an issue, what you do is
- At first go to the control panel and choose power options
- Then opt to choose when to turn off the display.
- Go for plug in option to never turn off display and put computer to sleep.
Acer Monitor keeps going to sleep? These Fixes work:
This can be resolved by the following method
- First, choose advance power setting
- Then click on sleep →system unattended sleep timeout→then choose the time limit for the screen going off.
For example, you can choose that the screen can go black in 5 mins of being unused Or 20 minutes.
The monitor keeps going black – How to Fix
It can be due to various reasons. Try the above-mentioned method, suitable to your system, and see if that can help you solve it.
Monitor keeps turning off
It’s very inconvenient when the monitor turns off while being used and essential daily. So here are the ways you can try fixing it.
First, you need to know whether the error is in software or hardware. To do this, here are the ways:
- Restart the monitor: The first thing which you do is to turn the entire system off and unplug it. Then for 30 secs at least put the power button on hold while the computer is off. Then withdraw the wires connected to the computer. Reboot the computer and press the F8 tab to put it in a safe mode. If your computer starts to work in safe mode then understand that the main problem is in the hardware.
- Drivers put to update: The drivers in the computer permit the software on the PC to work with the hardware. Then again to make the computer and monitor work together, a computer monitor driver is needed. To let the computer monitor work smoothly, the drivers need to be updated from time to time. Notifications pop up on your monitor driver alerting you if any update is required. Press the start button, go to the device manager.
A chart will appear before you listing all the hardwares you’re using. Look for the monitor and click on the update. If your computer is already off, then connect the computer or pc to the tv. A VGA to HDMI adapter is needed to do that. Video card drivers can also be the issue, so if your computer works fine on a safe mode then video card drivers can be the reason. You can uninstall it to let the work go on smoothly.
- Turning off the sleep mode: It is common for the device to go into the sleep mode if it’s not being used. So what you do is go to the power settings and see the time out. Turn it off.
- Potential cable destruction: Sometimes the main problem lies within the hardware and when the question of the monitor arrives, a damaged cable can be the reason. Faulty wires and cables might suspend the power supply. So the best way is to replace it.
- Graphic cards and motherboards issue: This is not likely to be found more often. This is the last option where the problem can be with the motherboards or the graphic cards. If you are brave enough to put the device apart without any professional help then you can easily figure this out by attaching the display cable to the integrated CPU or external card. This might not be suggested for the ones who are completely off the field.
So the problem can be anywhere. If the software is the issue then it is the drivers that need an update and if the hardware is an issue then the faulty cables or the internal parts have been damaged.
Conclusion
The source of the problem varies. So we need to understand where the errors are coming from. The moment we can detect it and synchronize it with the help of the above-mentioned methods, the issue can be resolved in less time
Since we do not have access to getting expert help at the very moment, these methods come to the rescue. Even after so much effort, the issue cannot be solved, it is always advisable to take professional help that will save your time and from further damage.
Hope you find this article to be helpful and it saves your time and effort.