How to Fix Lenovo Laptop Screen Flickering? [Solved]
In this post, we will cover all the possible reasons and fixes for your Lenovo laptop screen flickering issue. Ready to dive in?
Let’s get started
Lenovo Laptop Screen Flickering Fixes
If your Lenovo laptop has some weird screen flickering issues with a black screen, often, it is because of problems with either of the following: Drivers / BIOS / Hardware issues.
so below are some troubleshooting steps that can put your laptop back to work. The inconvenience can be due to various reasons: are not updated drivers, BIOS, or malfunctioning of the hardware/software.
Here is the process,
Update Outdated Drivers

Outdated drivers may cause such hindrances. Try upgrading the chipsets drivers and graphics drivers to solve the issue. Let’s just hope for the best and proceed!
The following are the two ways that can help you choose the right drivers for the chipset and video card.
You can go to the device manager and directly search for the display drivers.
Alternatively, you can visit the Lenovo website and look for the correct drivers that go with the windows version you have. Then download and install it.
Now that we are done with updating drivers, let’s move to BIOS Update.
BIOS Update
BIOS acts as a mediator that helps in the interaction between the operating system and the hardware of the laptop.
An outdated BIOS can often indicate inefficient interactions between the hardware and the operating system of your pc.
Don’t want that right? So go and update it by following these methods now!
- Visit the lenovo website and look for technical support.
- Now, click the search icon, and type the name of the product you are using.
- Click on the Driver and Software Option, then a list will appear. Tap on the BIOS/ UEFI option.
- You will see an eye shaped icon on the expanded area under BIOS. When you click on that, a download option will appear.
- Download the BIOS.
- Then go for opening the executable file and install the BIOS.
- Finally restarting your device will ultimately fix this issue
You can follow this video if you have issues following these steps:
Recommended Read: Lenovo Flex vs Yoga
Hardware Malfunction
Here are some hardware problems that can be solved with these troubleshooting fixes.
- Often a magnet placed around your device can trigger such issues. If found then change its place.
- Faulty cables can also cause such problems. Try reconnecting and see if that fixes it.
If the above methods don’t work for you, you can try doing a system restore if you have one created already.
If you are unable to turn your laptop on, I recommend you read this post first.
If the above steps and fixes did not work for you, you can try other fixes mentioned down below:
Lenovo Laptop Screen Flickering Horizontal lines Issue
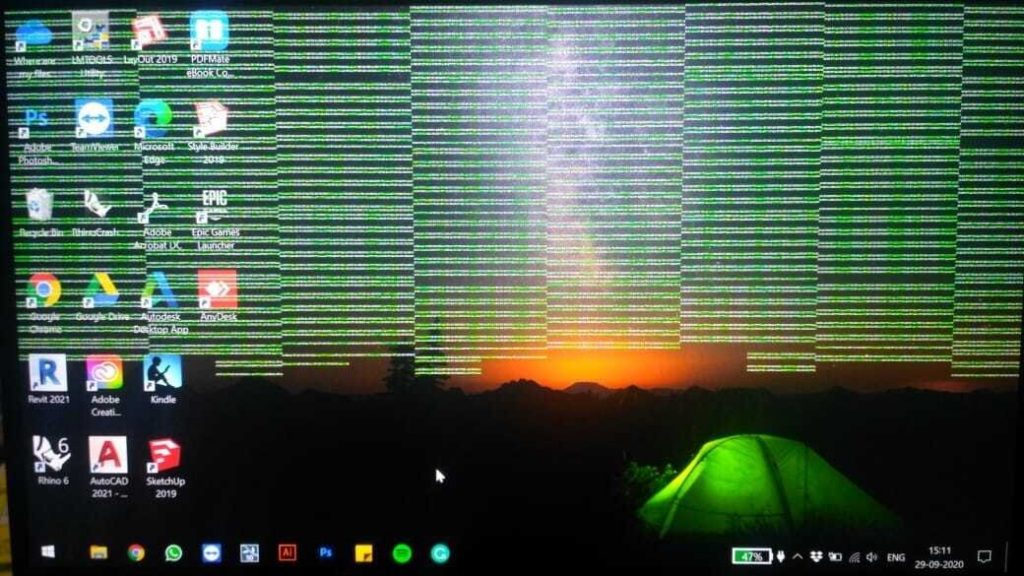
If you are facing an issue like the above-displayed image, don’t worry.
This is a pervading issue, there’s nothing to worry about. Horizontal flickering lines can be due to faulty wires or the drivers are not updated to the latest version of the BIOS.
Follow the above-given steps and see if that fixes your issue. If you’ve been disappointed, then get an expert’s help from the Lenovo technical support.
Also Read: Dell vs Lenovo Laptops
Lenovo laptop screen blinking On and Off Issue

This is mostly happening with lenovo users that have windows 10 or 11 installed.
If you’re using Windows 10 or 11, then here are some troubleshooting fixes:
- Go into the safe mode
- Try uninstalling the display driver and the chipset.
- Then reinstall it.
- For the successful installation of the drivers, try scanning the hardware by running the cmd command.
- Restart the whole device under safe mode.
These simple steps can help you fix the problem.
Lenovo Ideacentre Screen Flickering Issue
If your Ideacentre PC’s screen is flickering, it can be due to overlapping of the files in the system or using an outdated system, or drivers.
Try the following fixes:
- For the maintenance of the system, tap on the windows logo, write Troubleshooting and a list will appear.
- Choose System Maintenance, then tap on advanced and after that tap on the option pg Apply Repairs automatically.
- Read the steps carefully, and have patience till it is completed.
- When it’s successfully finished, then close the windows and see if the problem has been solved.
For the graphic cards update, follow these methods:-
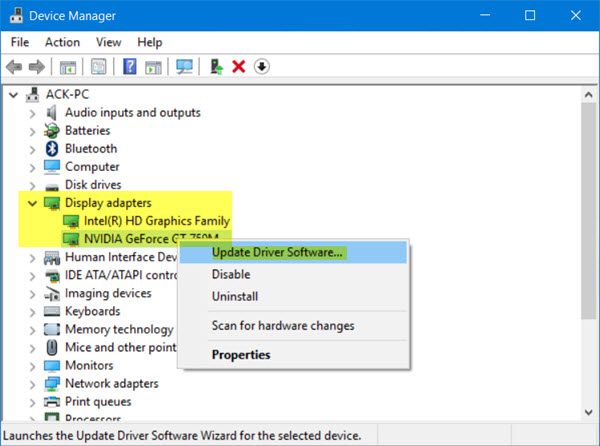
- Tap on the windows icon along with the key X . Choose Device Manager from the list.
- Under the display adapter, right click on the option of graphic driver and choose the option of updating the software.
- Wait until the update is finished.
- Then finally clear the device and restart it.
- If not fixed, purchase a new version of graphic cards. That may resolve it.
Lenovo laptop screen is Fuzzy
The fuzzy screen is again a very widespread issue, it might be due to outdated drivers and BIOS or the inappropriate screen resolution. Try updating the mentioned areas. If still, that does not help, it will be better to get in touch with the technical team of Lenovo. Fuzzy Things Cause Fuss!
Laptop Display Blinking Problems
You’re using your laptop and suddenly the screen goes blinking. We don’t like that! Right? So here are the methods given to save your time and energy.
Readers Also Saw: Best Laptops for Watching Movies
- So the first thing as mentioned earlier also is to update your drivers while your laptop is on the safe mode. You can try uninstalling the present display adapter and then look for the updates.
Here’s how to restart in safe mode:
- Click on the Windows task tab, and then to start your pc settings, click on the gear symbol.
- Choose update and security.
- On the left hand side of the task bar, an option will be given “recovery”, select that.
- After that beneath the Advanced startup, choose the restart now option. After the restart, a blue troubleshoot screen will appear which will solve your issues of startup repairs and system restores.
- Go for the advanced option .
- Then go for the startup settings and click on restart
- After it is restarted, using the number keys or function keys (1-9) select #4 to activate safe mode.
Uninstalling the current display driver in the safe mode
The method to do it is as follows:
- To bring into access the power user menu, right click on the windows taskbar.
- Choose Device Manager.
- Beneath the device manager, tap on the display adapters to extend and show the active display device.
- To start the operations task list, right click on the display adapter currently installed.
- Click on uninstall device option.
- Fresh box will appear giving you the option to delete the driver software for this device.
- Click on uninstall option
- Reboot the PC
Reinstalling the display drivers
- Right click on the windows taskbar then open settings from the power user menu
- Tap on update and security
- Choose the option ‘check for updates’ present beneath the ‘windows Update’. Wait for it to download then install the updated display driver.
Downloading the newest drivers from Lenovo’s
With Windows 10, it is way easier to upgrade your PC but it may discard some important drivers.
Here are the methods to update your drivers manually. To check for the display card’s manufacturers, use the following ways-
- Right click on the Windows taskbar to open the Power User menu
- Tap on run
- Write dxdiag on the run dialogue box
- A tool window will appear on the DirectX Diagnostic permitting you to all of the information of your hardware PC.
- Tap on display 1.
- All the display information will appear before you. Hence it will provide you with a clear cut idea of where to find the direct driver updates and downloads.
Most of the Lenovo devices are well maintained by the given display driver manufacturers including:
- AMD
- NVIDIA
- Intel
Each of the above-given manufacturers has the best services given to your particular drivers and they also have a page for the driver updates and downloads for your convenience.
In any of the above cases, you can try a few fixes.
Windows display manager to be disabled.
Even if Windows Display Manager provides you with appealing features it may cause disturbance in the screen sometimes. So to disable the Windows Display Manager, here are the ways
- Right click on the Windows taskbar and open the power user menu
- Tap on run
- Write services. msc in the box
- Look for Desktop Window Manager Session Manager and tap on stop option.
- Then again choose the Desktop Windows Manager and tap on properties option
- Beneath the general tab, click on disabled option
- Tap the ok button.
Refresh Rates to be changed
When you are using an external monitor, the laptop may face flickerings and in some cases, it is because of incompatible refresh rates. So if you change the refresh rates, it can solve the issue.
Here’s the way to do it:
- Press the Windows Key and Search for settings
- Tap on settings
- Tap on the icon with the label as system when the settings is opened.
- Tap on display on the side taskbar
- Beneath the Multiple Displays option, choose Advanced display settings.
- See for the refresh rates for your PC and the external monitor
- Tap on Display Adapter Properties to alter the settings.
If you find that the display needs a higher refresh rate, then you should attempt to reinstall the drivers as well.
Check out: Monitor Keeps going to sleep? [Try these Fixes]
Wrap up…
So these were the most common Lenovo Laptop Screen flickering issues and their fixes.
If you have tried all of the above-given methods and your issues have still not been resolved, it is better to look for an expert to fix the problem.
That is the most reliable way to prevent further damage. Even if you are not confident in trying out troubleshooting, then no need to go for it. Ask for a professional’s help and fix the damage.
If there’s any other fix that helped you out, please share it with us and help others along the way.


![How To Fix A Broken Laptop Hinge? [In Less Than $1]](https://expertratings.net/wp-content/uploads/2022/05/How-To-Fix-A-Broken-Laptop-Hinge-Under-1-768x432.jpg)