How to Screenshot on Asus Laptop? [4 Simple Ways]
Don’t you think that the enhanced technology has been very useful to us? Like we can literally copy any information and save it by just a tap on the mouse. But as we know we cannot copy-paste every sort of data, so for that, we have a very unique feature of taking screenshots, it’s the most helpful thing that can be done at that moment.
Now, screenshots are basically an image of whatever information, visual data, or content is displayed on the screen of your particular device. You can capture your screen with just a few taps and clicks.
Being an Asus laptop user, you are probably using the Windows OS regardless of whether you also have a Zenbook or Vivobook.
Every Asus laptop has windows in it and they always try their best to give their users the best tools and apps that are available.
But the case is different with the screen grabbing on the PC. Here the users are required to pay the price for convenience as only a restricted amount of screen capture options are available.
Now, due to this, these users have to install some additional screenshot apps which provide them with better features, the ones not available in Windows Os built-in tools, like editing and annotating screenshots.
There are several different methods and hundreds of applications to take screenshots in various devices, built according to specific user needs.
Here is the simplest way to take a screenshot on an Asus laptop :
By using PrtSc
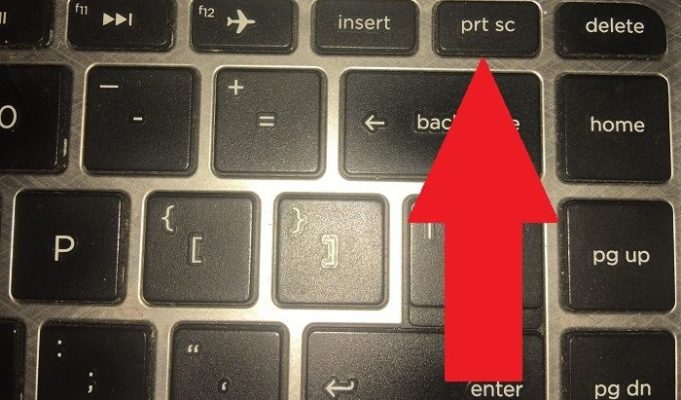
- Firstly, you need to open the site or the page that you would like to take a screenshot of.
- Then on your keyboard you might see a PrtSc button on the right side of the top row of keys,click on it once and your screen will immediately get captured.
- If you wish to edit your captured snap you can do it by any editing program like Paint or Gimp.
- Now, paste your screen grab by pressing on Ctrl + V buttons on your keyboard.
- Lastly, save the file and you’re done.
There are various alternatives as well that can be used to do the same.
Option 1: Use The Keyboard Shortcut: Windows + PrtSc
This method is a more intuitive way of taking a screenshot on an Asus laptop. As you know the PrtSc key alone is enough to capture your screen. But pressing Windows+PrtSc is taken and saved immediately. This keyboard shortcut simplifies the screenshot process, and now it can be completed by just pressing two keys.
As soon as you press these two buttons simultaneously, your screen will flash making certain that your screenshot is taken and saved. And you can find the image in the pictures section of your computer, probably in a folder named screenshots.
Option 2: Using The “Snipping Tool”
The snipping tool is one of the most commonly found tools. You will surely find it in any Asus laptop. This tool is specially designed by Windows for taking screenshots and this feature is in almost every version of Windows OS. This tool has been available since Windows Vista and works well in the latest version of Windows 11, it is called snip and sketch.
With the help of this tool, you not only capture your screen but it provides you with certain options to edit the captured image, like cropping the not-so-required part of the content.
Steps:
- The user needs to click on the Windows logo key on the laptop keyboard and type in Snip in the search box
- The user needs to select and launch the Snipping Tool from the search result and then need to click on New at the top left corner of the page.
- The user needs to click and drag to select a certain area of the PC to screen and then release the mouse button.
- At last the user needs to click the Save snip icon and save the latest screenshot instantly.
Though the snipping tool sometimes gives a delayed response, it has certain advantages over a general screen option such as scrolling screenshots, creating GIFs, and saving to library options.
Using Extensions/Plugin
Other than the above-explained screenshot options, there are much more available in the software marketplace to take a screenshot on an Asus laptop based on user needs. It happens a lot of times that the PrtSc option doesn’t work for all sorts of visual content, so we always require a second option.
Now there are certain well-known screenshot extensions that can be used for the same, like Fireshot, GoFullPage, Nimbus screenshot, video recorder, Lightshot, etc. These all screenshot options can be found in the chrome web store for free.
These extensions are not only unlimited to Chrome browser, but you can very well install them into Opera, Firefox, Edge Browser, Brave, and so on. At the same time these plugins provide a lot of additional features for editing, highlighting, resizing and cropping, annotations, and export as PNG or JPG format, etc.
How to take screenshots on Windows 7/8 or 10 and 11?
To take a screenshot on Windows 7 or 8 or Windows 10/11 the user needs to press the PrtSc key and the Windows key at the same time.
This helps the user in taking a screenshot of the entire screen. The user can then easily access the screenshot folder in the documents to find the screenshot.
How to take screenshots on an Asus Chromebook?
To take a screenshot on an Asus Chromebook is quite easy and quick. You just need to use a keyboard shortcut: CTRL + Show Windows. The show Windows button is located on the top row. Its icon has a rectangle and two vertical lines.
You can take a screenshot by pressing the power button and volume down button simultaneously if you are using a Chromebook tablet, otherwise, the above keyboard shortcut will do for laptops and computers.
You can retrieve all your taken screenshots by clicking on the launcher located at the far left of the taskbar. You can move them to Google Drive, Google Photos, or any other desired location.
How to take a custom screenshot on an Asus laptop?
If you are using a Windows 10 on your Asus laptop, you can take a custom screenshot using your keyboard only:
- Press Windows Logo, Shift and S buttons on your keyboard simultaneously.
- Drag your mouse and select the area of which you want to take a screenshot, and then release your mouse button.
- If you wish to edit the captured image you can using the paint program and then save it on your PC
There are many other shortcuts on the Asus laptop that the users must know:
- Fn + F12 = MyAsus – MyAsus is the most useful shortcut key that every Asus laptop has. From this the user can assign all the different keyboards giving F5 and F6 combined with another key to launch a command.
- Fn+F2= Airplane Mode – due to some reasons MacBooks don’t have a shortcut key for entering the Airplane mode but the Asus laptops and many Windows laptops have the airplane mode by simply pressing fn + F2.
- Fn+F8=Display Mode- If the user uses several different displays with the device ,then the shortcut key helps them a lot. This allows the user to switch between the screens and it is one of the most useful keys on an Asus laptop.
Conclusion
This article contains almost every detail that you need to know about how to take a screenshot on an Asus laptop. I hope it helps. There are numerous other ways to take a screenshot, but with the new versions of Windows, it becomes easier and easier for the users to do so. Every updated version comes with various additional features that make your task even simpler than ever before.
![How to Fix Lenovo Laptop Screen Flickering? [Solved]](https://expertratings.net/wp-content/uploads/2021/12/Fix-Lenovo-Laptop-Screen-Flickering-768x433.jpg)
![How to Fix a Lenovo laptop that Won’t Turn ON? [Super Easy]](https://expertratings.net/wp-content/uploads/2022/02/How-to-fix-a-Lenovo-laptop-that-Wont-Turn-ON-Super-Easy-768x403.jpg)
![Windows 10 Auto Login [Fast Steps]](https://expertratings.net/wp-content/uploads/2021/10/Windows-10-auto-logon-768x403.jpg)